Tag: West Oak Design

  • Christie’s Hand Stitched Bowl Tutorial

    Photos + Tutorial by Christie Sommers
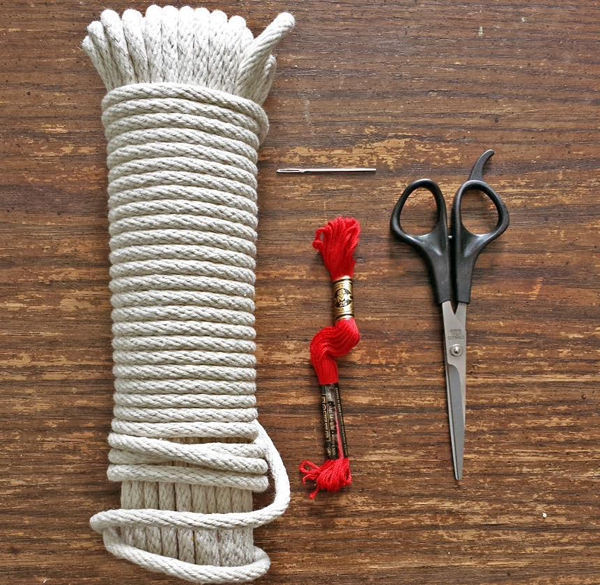
    Photo 1
    You will need:
    -cotton clothesline
    -quilting needle (you can use a regular sewing needle with a thimble but a larger quilting needle is best for passing through the thick clothesline)
    -embroidery thread, yarn, or string in color of your choice
    -scissors

    Photo 9
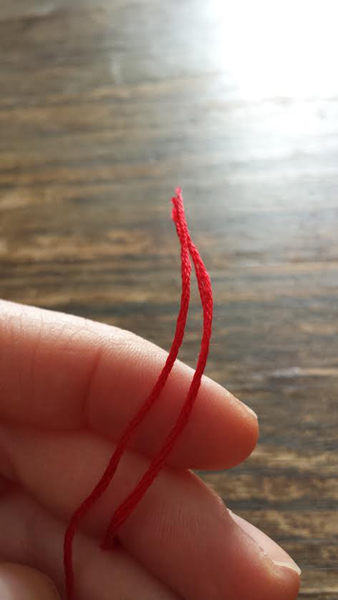
    Thread the needle with colored string of choice and tie a knot at the end.

    Use as much thread as you can manage. No more than 3′ should suffice. You can tie more thread on when you run out.

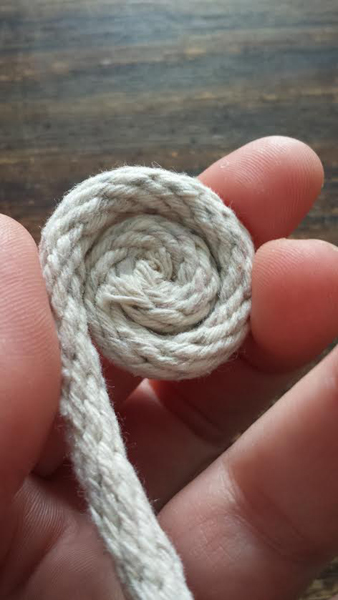
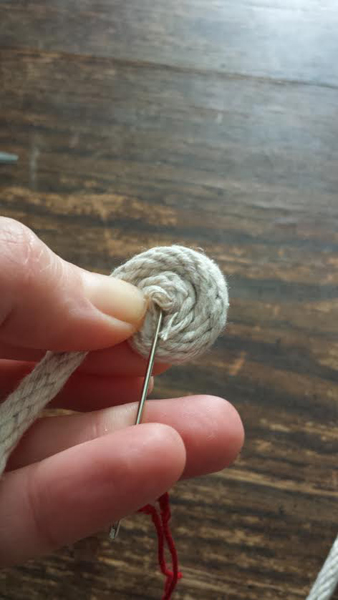
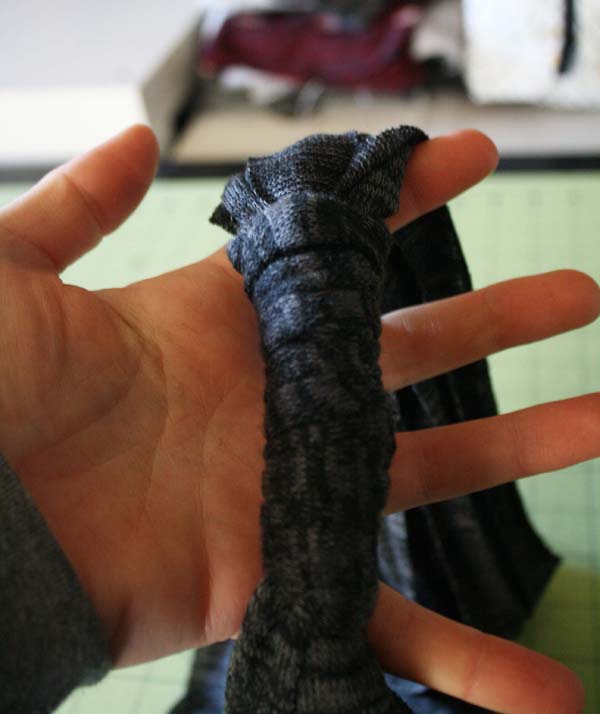
    Start by coiling the clothesline between two fingers as shown.

    Photo 10
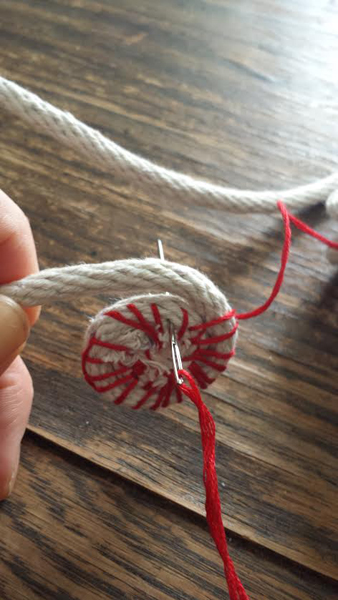
    Insert the needle into the center of the coil passing through the layers of rope and exit as shown.

    Photo 11 Photo 12
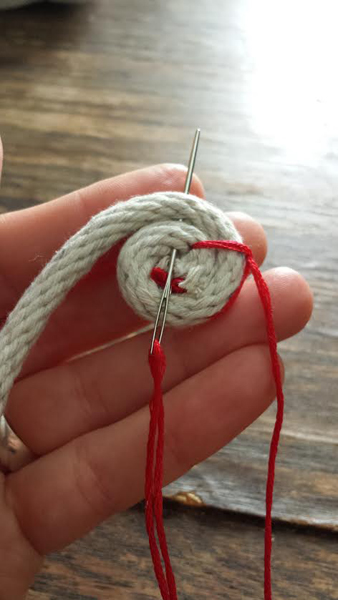
    We will be using a blanket stitch for this project. Wrap your working thread behind the needle from right to left.

    Photo 13
    Bring the thread back over the needle from left to right and pull the needle through.

    Photo 2
    Repeat going around in a circle, entering in the center, until you reach the first stitch.

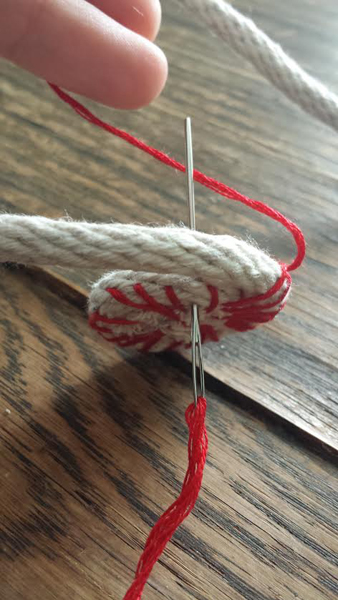
    If you want a bowl with a wide flat base, you can continue the flat blanket stitch going around a few more times until the base is as wide as you like.

    Photo 3
    At this point you will be rounding up to give your bowl a curved shape.

    To achieve this, you will be inserting the needle straight through the clothesline from front to back rather than from the center out. See pic.

    Photo 4
    Continue with the blanket stitch inserting the needle through the clothesline from front to back until your bowl is as large as you like.

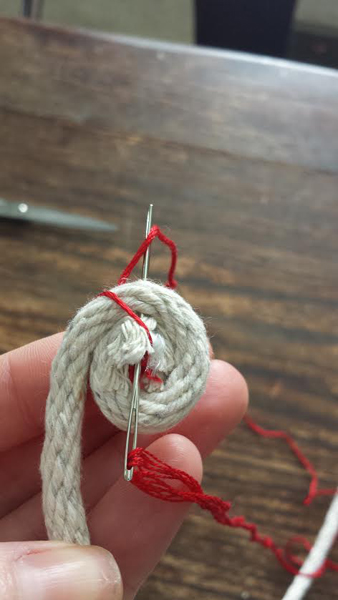
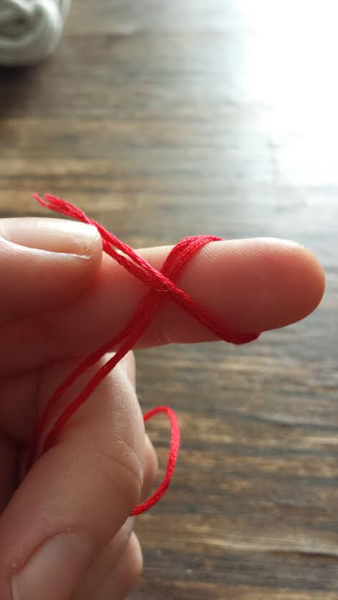
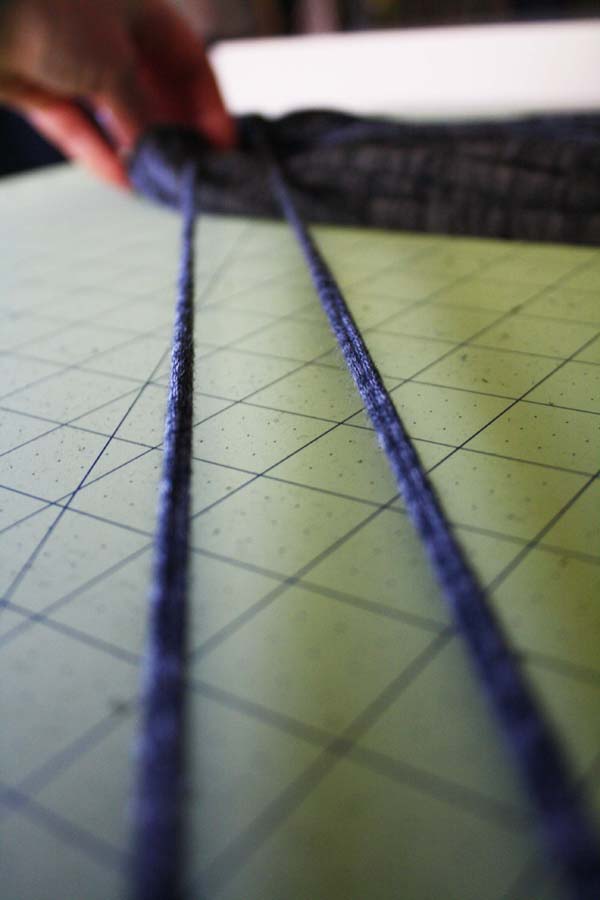
    You will most likely run out of stitching thread as you are working. To add more, tie a new 3′ length of thread to the tail of the previous working thread. Place the ends together as shown and tie in a knot.

    Photo 5Photo 6
    For the next few stitches, Insert the needle Between the coils instead of through the rope until your knot is hidden.

    Photo 7
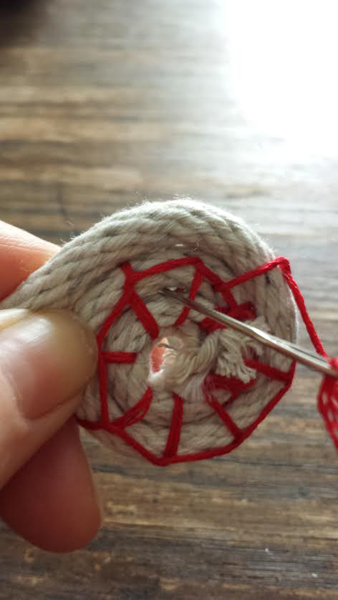
    Once you pass the knot, continue stitching through the rope until you reach the desired bowl size.

    Tie off your working thread and then snip the clothesline, You’re done!

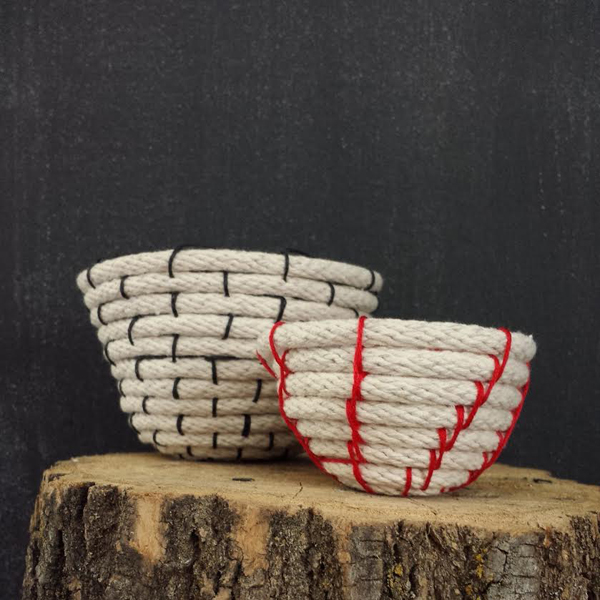
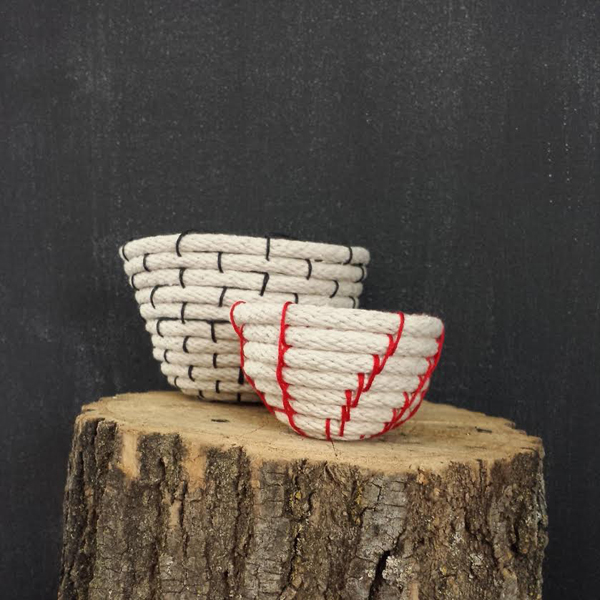
    As you can see from the next photo, the placement of your stitches will determine the design of your bowl. For the black bowl, I spaced my stitches out and staggered with each layer, essentially placing new stitches between the stitches on the previous level. For the red bowl, each new stitch was placed right next to the previous level’s stitch.  Play around with stitch placement to see what you can come up with.

    Photo 8
    Enjoy!

    —————————————————————————————————————

    Christie Sommers is the designer and maker behind West Oak Design. She handcrafts small batch and one of a kind goods for home, women, and kids in her Wyndmoor, Pa studio.www.westoakdesign.com


  • Christie’s Herbal Conditioning Rinse Tutorial

    Tutorial + Photos by Christie Sommers of West Oak Design

    Here is a miracle rinse to tame the driest of winter hair. Don’t be afraid of the vinegar… I promise you won’t smell it in your hair after your shower. The acidity of apple cider vinegar smooths the hair cuticle and leaves the frizziest hair looking shiny and healthy and feeling incredibly soft.  Try this herbal rinse as a treat for yourself.. or your valentine.

    You will need:

    -3 cups of filtered water (separated)
    -1/2 cup of apple cider vinegar
    -A few sprigs of rosemary (dry or fresh)
    -2 teaspoons of lavender..use more or less to your liking.
    You can add just about any herbs you like according to your scent preferences. I added chamomile. This recipe is very flexible
    -5-10 drops of essential oil of your choice (I used rosemary & lavender)

    Image 1

    *Boil 2 cups of filtered water

    *Remove from heat and add your herbs. I use rosemary for its clarifying properties, lavender for its relaxing scent, and chamomile which adds subtle golden highlights. Note: try hibiscus for red highlights

    Image 2

    *Let steep for at least 45 minutes. The longer the better. Sometimes I’ll let it sit covered all day.
    *Allow herbal tea to cool completely.
    *Pour tea through a fine mesh sieve to remove herbs.  A tea ball infuser works well too.

    Image 3

    *Add 5-10 drops of essential oil to…
    * 1/2 cup of apple cider vinegar

    Image 4

    *Add 1 cup filtered water to the filtered “tea”, then add the vinegar/oil mixture

    Image 5
    *Recipe yields 3 cups.
    *I fill a spray bottle for the shower and pour the remainder into a mason jar for later.
    *I wash my hair every other day and use this rinse every time.

    After 2 or 3 uses you should begin to see a huge improvement in the softness and shine of your hair.

    Enjoy!

    _____________________________________________________________

    Christie Sommers is the designer and maker behind West Oak Design. She handcrafts small batch and one of a kind goods for home, women, and kids in her Wyndmoor, Pa studio.www.westoakdesign.com

  • Christie’s Spaghetti Scarf Tutorial

    cowl shotby Christie Sommers of West Oak Design

    This is a nice little project to use up scrap jersey knit fabric or an old t-shirt.

    You will need:
    *scissors OR (a rotary cutter, straight edge, & cutting mat)

    *A “tube” of jersey knit fabric. For a no sew version you can cut the tube from a t-shirt. To use a scrap of jersey knit fabric, cut a rectangular strip roughly 16″ x 42″ and sew the two short ends together to form a tube (folded and sewn it will measure 16″ x 21″)

    01

    Take your tube and cut into 1″ strips taking special care to leave 1″ uncut at the top.

    02 (1)

    03

    When you get to the last strip, cut all the way through. This strip will become the wrap to hide the seam or uncut section at the neck.

    04

    05

    Gather the scarf and hold at the seam/uncut section.

    06

    Tie the last strip to the seam/uncut section and wrap around until it is covered.

    07

    When you have wrapped all the way to the end of the seam/uncut section, lift the last loop and tie the end of the wrapping strip to it. Snip the remaining strip leaving about an inch.  Tuck the leftover inch under the wrapped section.

    08

    09

    10

    Now the fun part….

    Hold the wrapped section and pull each individual strip as far as you can.  You may need to sit on the floor and place the wrapped section under your foot as you pull and stretch each strip which forces the jersey knit fabric to close in on itself, hiding seams and leaving neat strands.

    11

    You’re done! Wear it long or loop it around for a nice looking cowl.

    ______________________________________________________________
    Christie Sommers is the designer and maker behind West Oak Design. She handcrafts small batch and one of a kind goods for home, women, and kids in her Wyndmoor, Pa studio. www.westoakdesign.com

  • Christie’s Paper Garland Tutorial

    garland2Tutorial + Photos by Christie Sommers

    Try this inexpensive and easy tutorial to spruce up your place or decorate for a party. Paper garland is a great way to reuse old travel maps. You can also use colored or decorative paper purchased at your local craft shop.

    You will need:

    *paper….at least the thickness of printer paper, newspaper may be too thin.

    *a sewing machine set to straight stitch, threaded in color of your choice

    *scissors OR (rotary cutter, straight edge, cutting mat)

    *a paper punch (I used a Fiskars 1/2″ paper punch) You can get creative with a vast assortment of paper cutter shapes found at your local craft store in the scrapbook section. Don’t go with anything smaller than 1/2″ because it will be difficult to feed through the sewing machine.

    Supplies

    Start by cutting your paper into strips. I cut mine into 1″ strips. Just be sure your strips are larger than your paper punch shape.

    cutting

    Go nuts punching out your shapes.

    punch

    Do a little math to find how many circles you will need to make the length of garland you want. In my case (2) 1/2″ circles equals roughly 1″ of garland.

    With your sewing machine set to straight stitch & threaded in the color of your choice, begin feeding each circle under the presser foot.  The feed dogs will take it from there. Have a pile of circles very close by and place one circle right after the other without overlapping.

    stitch

    Before you know it you will have yards and yards of garland!

    garland 3

    To store: you can carefully wrap around a piece of cardboard until you are ready to use..

    Enjoy!
    ——————————————————————————————————————-
    Christie Sommers is the designer and maker behind West Oak Design. She handcrafts small batch and one of a kind goods for home, women, and kids in her Wyndmoor, Pa studio. www.westoakdesign.com


The owner of this website has made a commitment to accessibility and inclusion, please report any problems that you encounter using the contact form on this website. This site uses the WP ADA Compliance Check plugin to enhance accessibility.