Tag: artstarphilly

  • Make This: Striped Screen Printed Clipboards

    Photos + Tutorial by Bonnie Kaye Whitfield

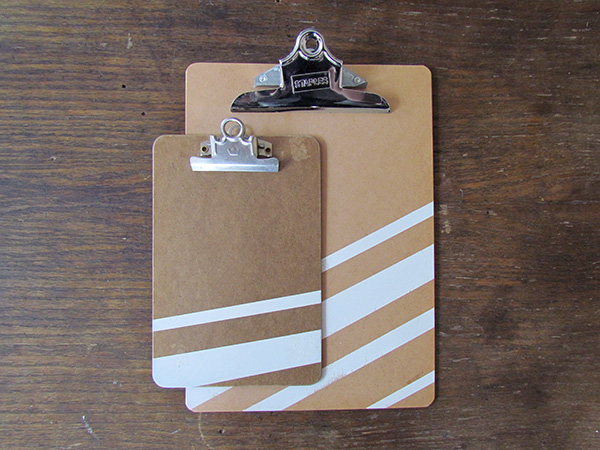
    Sometimes things just needs a little sprucing up. This time of year, when many of us try to focus on spring cleaning and organizing, I find that I need a bit of motivation. Here’s a speedy screen printing method to jazz up old clipboards, but could also be used on other flat office supplies, such as binders, folders, box lids, etc.
    Blog_6_Pic_11

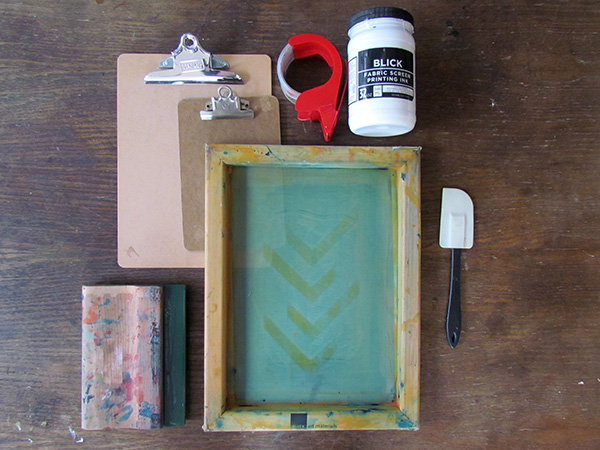
    You will need:

    clipboards
    screen printing frame
    screen printing ink
    spatula or plastic spoon
    squeegee
    packaging or blue tape
    a friend to hold down your screen / or a hinge clamp board
    Blog_6_Pic_1

    Gather your materials. I had a few old clipboards lying around my studio that definitely needed a facelift, but you can always purchase plain ones at Staples or Target. The screen printing frame that I am using is from Blick. It’s pretty amazing what you can do without fancy screen printing equipment. With screen printing, you are masking, or blocking, parts of the open screen to create a stencil. Whatever is “open” will print, whatever is “blocked” – in our case with tape – won’t print. I find that you can create fun geometric designs by simply using tape. If you’re looking for something more complex, try cutting a stencil out of contact paper. Same idea.
    Blog_6_Pic_2

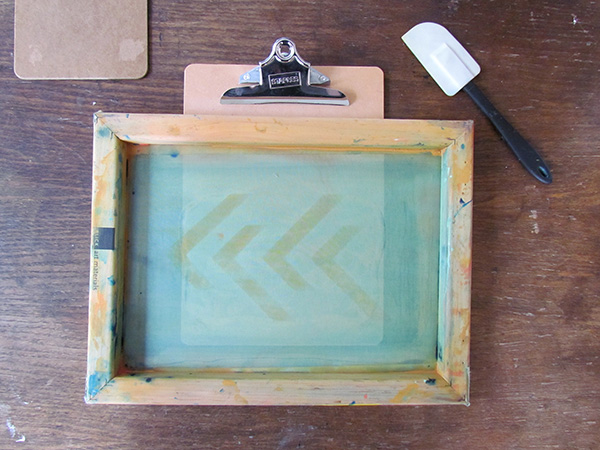
    When you screen print, the screen needs to be directly flush and in contact with whatever you are printing on, with the frame facing upwards. Place your clipboard underneath your screen, as you’ll be printing, to get a sense of size. Your screen should be larger than your clipboard, and needs at least a 2” border buffer, as printing too closely to the edge of the screen is tricky and just doesn’t print well.
    Blog_6_Pic_3

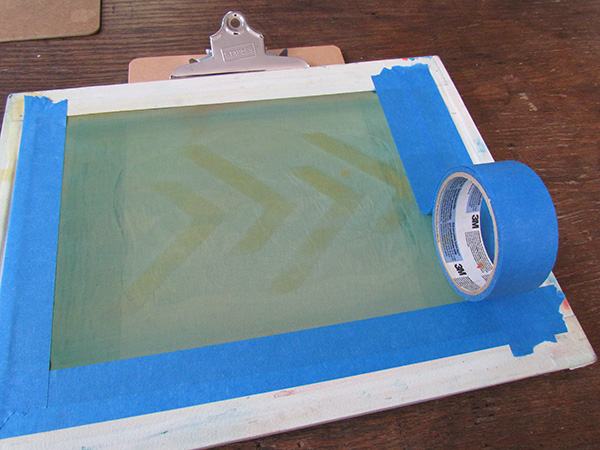
    Flip your screen over. You’ll now block parts of the screen using tape. Begin with the sides and bottom of the screen so that you get closer to the actual size of the clipboard. Then have fun with creating open stripes or geometric patterns with your tape. Just keep in mind that you’ll eventually have to flip your screen over again, so remember that your print will come out in reverse of what you are taping.
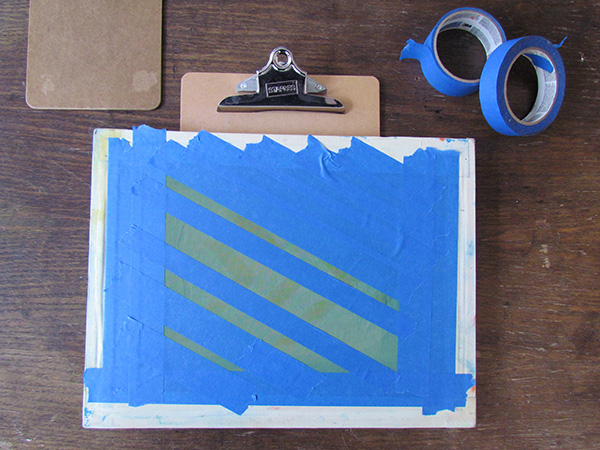
    Blog_6_Pic_4

    Before printing, flip your screen over to get a better sense as to what will print. I’m going to print off the edges of my clipboard, which is why the open area is larger than my clipboard, but feel free to keep the printing contained within the printing surface. It’s definitely less messy that way.
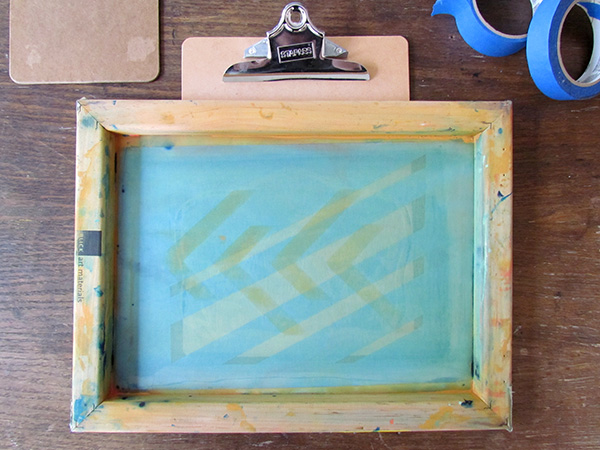
    Blog_6_Pic_5

    To print, you’ll need the frame to be held in place, either by a handy friend or in my case, a hinge-clamp board. Gather your ink + squeegee.
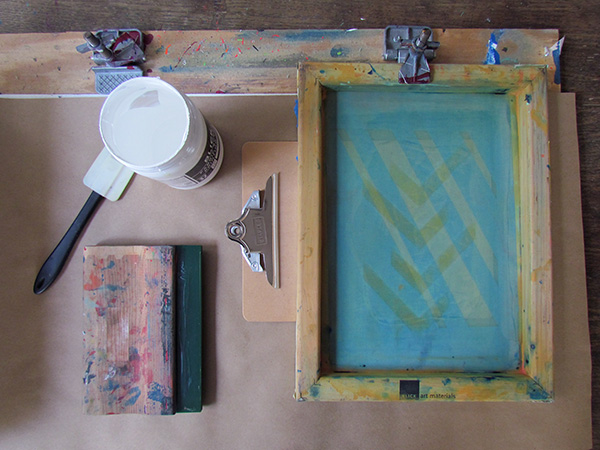
    Blog_6_Pic_6

    Position the clipboard directly under the screen where you want to print. Using a spatula or spoon, spread ink to the top of your screen in a line.
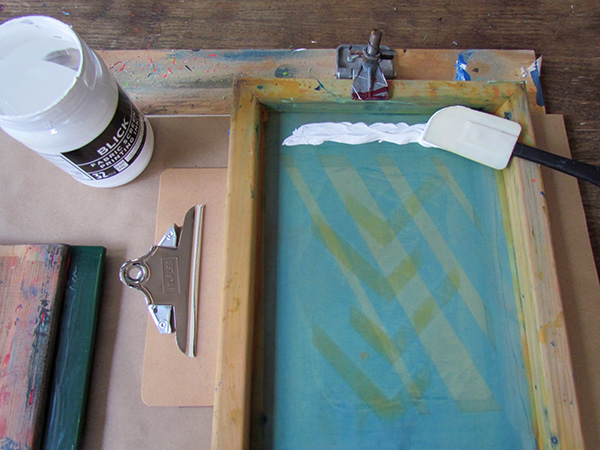
    Blog_6_Pic_7

    Before printing, you need to “flood” your screen. Using your squeegee, which should be a little wider than your design, in your dominant hand and holding the frame up in your other hand, pull the ink towards you at a 45 degree angle. This is filling the open screen with ink prior to printing. (Since I was taking a picture, I just rested my frame on my tape roll.)
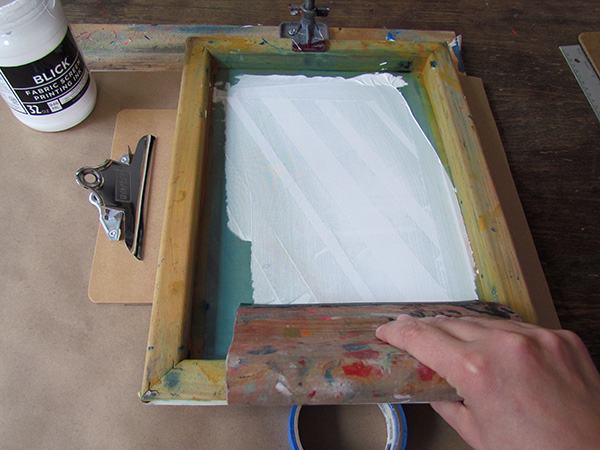
    Blog_6_Pic_8

    Once the screen is full of ink, place the screen down directly on the clipboard. With the screen firmly in place, pull the squeegee down again at a 45 degree angle. Don’t be afraid of really applying some pressure here. In fact, you may want to do 2 or 3 pulls, as wood will absorb some of the ink.
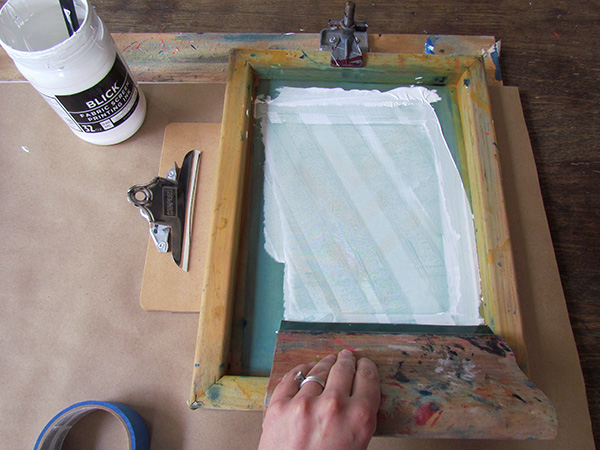
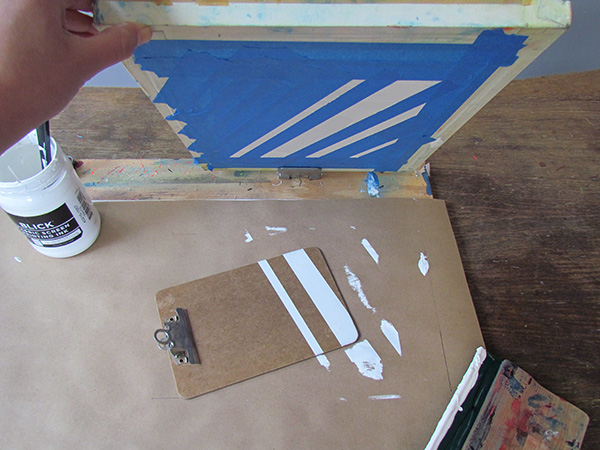
    Blog_6_Pic_9 Blog_6_Pic_10

    Gently pull up the frame and you should have a new, fancy updated clipboard. If you are printing on various size clipboards, as I did, be sure to print in order from large to small. And with printing, the time is in the setup not the printing, so why not line up a pile of flat items to print on while you’re at it!

    Blog_6_Pic_11

    —————————————————————————————————————————
    Bonnie Kaye Whitfield designs and screen prints home textiles + paper goods under the name, Bonnie Kaye Studio. Products are created to inspire memories at home and around the table. A donation is made with every purchase to help feed hungry Americans.
    www.BonnieKayeStudio.com

  • Meet Bobby + Sara of Just A Jar Design Press!

    justAjar_headshot

    Just A Jar Design Press is a letterpress & design studio run by Bobby & Sara Rosenstock. We have a large studio in the historic river town of Marietta, Ohio. We do a range of different things as a business, but for this post we will focus on our woodcut & letterpress prints.

    coopers

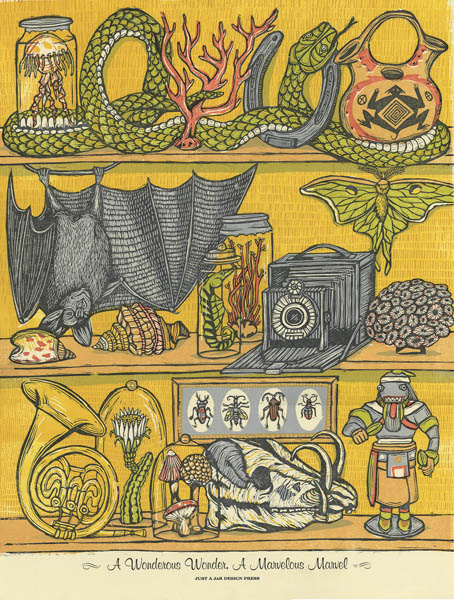
    We create fine art prints as well as gig posters that have all been commissioned for the actual events. Just about all of our prints are limited edition which means they are signed and numbered, & when they all sell we don’t print any more.

    wonder

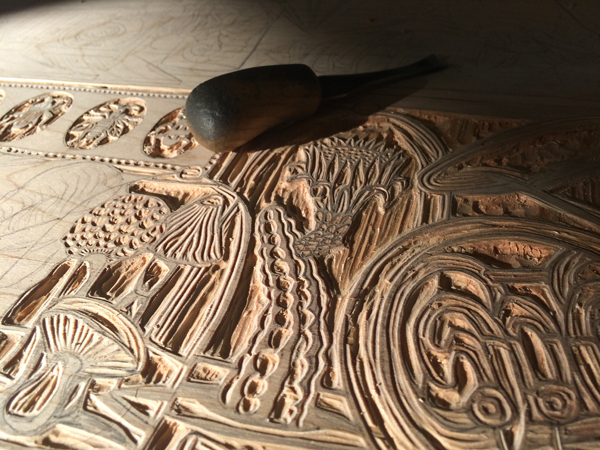
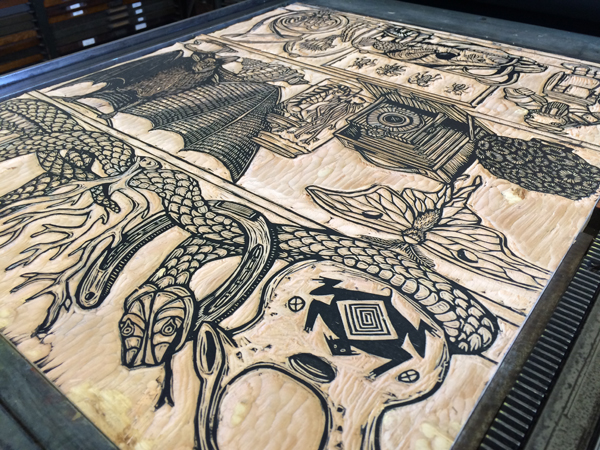
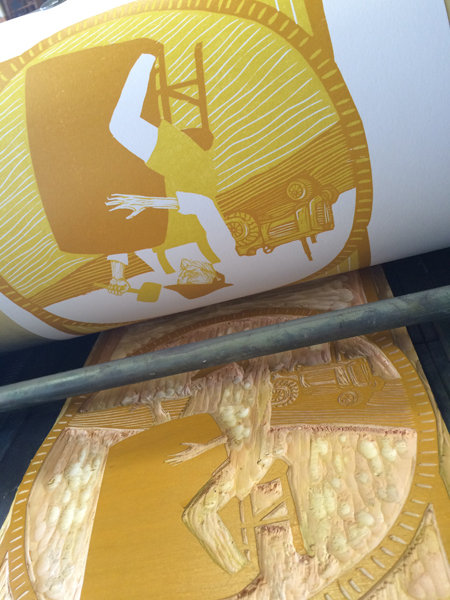
    The process begins with a pencil drawing to scale, which is then traced on to tracing paper so I can flip the image to reverse (woodblocks need to be carved in reverse). I make a plan for colors, typically written out in the margins of the drawing. Each color is carved on it’s own block typically, (I do some reductive printing but won’t get into that here). Using carbon paper I transfer the drawing onto pieces of birch plywood. I then carve the blocks for each color.

    wonder_detail6
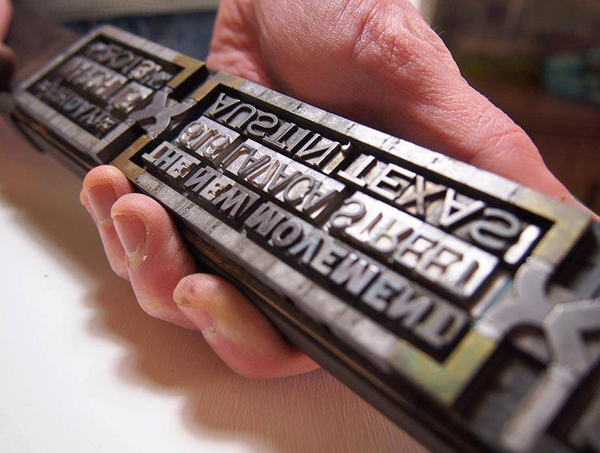
    The woodblocks are all manually printed on my Vandercook SP20 press, from the 1960s. I do a separate run for each color. If the print includes text, I will set some of my lead & wood type onto the press, & print that as a separate run.

    type2

    Typesetting is a craft of it’s own. I feel overwhelmed by the options when designing on the computer, but when I’m setting type, I’m limited by the size and typefaces in my collection. I also find that when I can touch it with my hands I can understand it better. Some of our wood type is over 150 years old, & I want that history to be represented in the work.

    type

    It’s a pretty slow and meticulous process, depending on the detail, a print can take anywhere from 40 to 100 hours to complete. Planning is a big part of the process, but I also think its important for some parts of the print to be spontaneous & of the moment. I enjoy the controlled rawness of the medium, and I want the labor of the process to come through in the image.

    wonder_detail3
    We are really excited to be returning to Philly in May for the Art Star Craft Bazaar. We do lots of art fairs each year but our very first one was Art Star in 2009. We haven’t been back since our daughter was born in 2012, so are thrilled to be participating this year. Come stop by our tent and say hello. If you want to see more of what we do you can find us here:

    www.justajar.com
    www.facebook.com/justajardesignpress
    www.instagram.com/justajar/
    www.twitter.com/justajarpress


  • Upcoming Exhibition: Same Same by Keith + Rita Greiman

    artstar_greiman_blog promo

    We are pleased to present an exhibition with Philadelphia based husband + wife artists, Keith and Rita Greiman.  The duo will be exhibiting their own individual works as well as collaborative pieces.  The exhibition will be on view from April 18th – June 21st, 2015.  There will be an opening reception with the artists on Saturday, April 18th from 6-8pm.   The reception is free and open to the public and will include light refreshments.

    Keith and Rita Greiman will present an all new body of playful and vibrant works, drawing inspiration from the humor and absurdity of life’s everyday objects and events.  The show will include Keith’s acrylic on wood paintings and 3D wood figures, which feature a cast of quirky and animated characters that are brightly colored and evoke a childlike quality.  Set against flatly painted patterned backgrounds, the floating figures and objects populating the pieces appear anything but innocent though.  Rita’s mixed media dioramas mirror the childlike, yet twisted quality of Keith’s work, containing glitter coated army men, food, and animals.  In addition to their individual pieces, they will be exhibiting new works together which combine their shared vision and include patterns, floating objects and characters, real and supernatural.  The couple will also be painting a large mural together on one of the exhibition walls. This will be their first time showing at Art Star.

    Keith Warren Greiman lives and works in Philadelphia, PA. His bright and animated images of real and supernatural beings depict life, captured in experience, being ascendant, melancholic and at all times wild. Keith’s work has been shown in various galleries and publications from all over and everywhere. Some clients include LA Times, Village Voice, Newsweek, the Fader, Ace Hotels, Fantagraphics, the Utne Reader, and Willamete Week. His work has been recognized by American Illustration, The Society of Illustrators and Graphis.

    Originally from Irvine, California, Rita Greiman currently resides in Philadelphia where she has been for thirteen years.  Through the years, Rita has done various works as a seamstress, illustrator, upholsterer, and designer.  She studied in the School of Visual Arts at Pennsylvania State University as well as the College of Communications. She has worked in several media and currently combines painting, sculpture, and found objects to create playful dioramas that are often centered around animals, glitter army men, and food.

  • Meet Art Star Craft Bazaar Vendor Jamie Langhoff of Seeing in Fabric!

    Pic 1

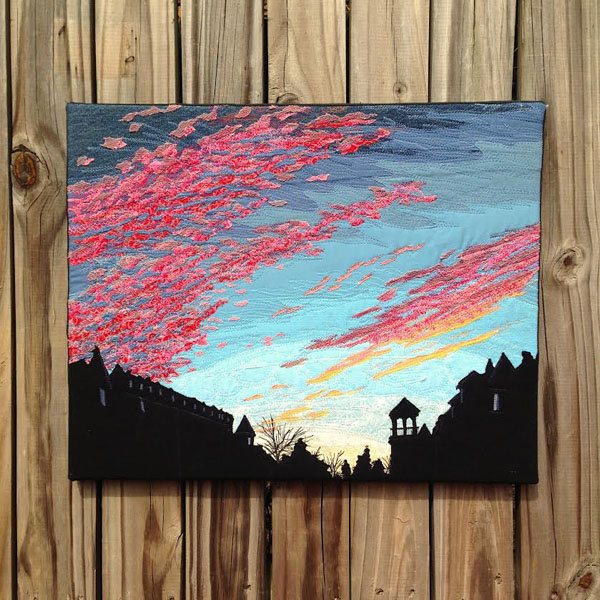
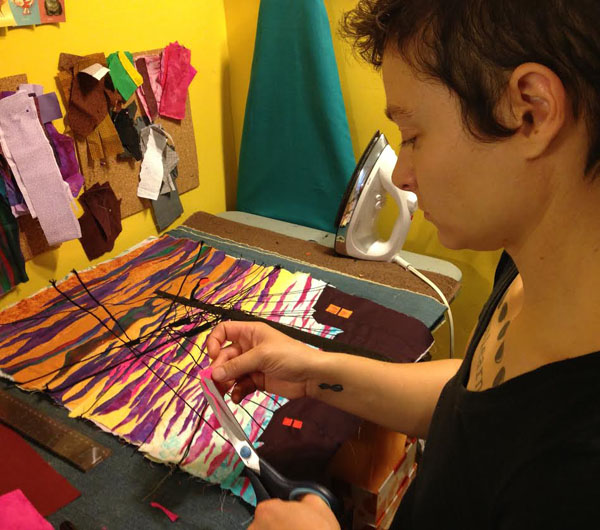
    What, at first, appear to be paintings, are actually sewn fabric art.

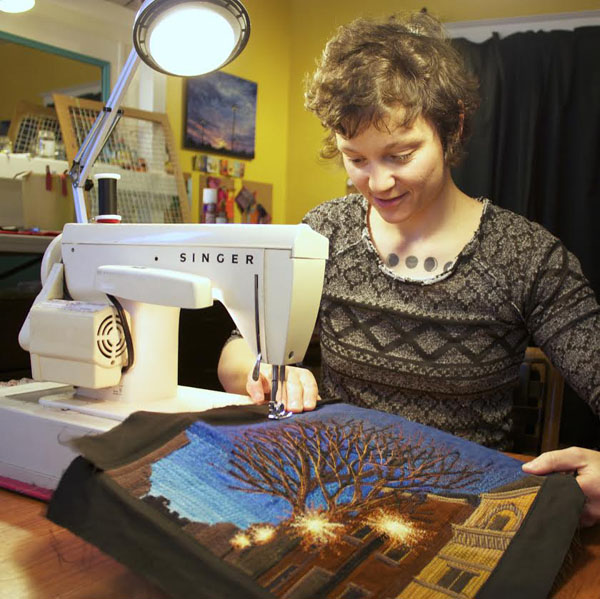
    Self-taught artist, Jamie Langhoff, creates vibrant urban scenes with just fabric, thread, scissors, and a 1968 Singer sewing machine. Finished artwork is mounted onto ready-to-hang canvas panels.

    Each scene features many dozens of tiny hand-cut fabric pieces. Creating these scenes requires a slow and careful building of many pieces of fabrics, and many layers. All of the fabrics she uses in her artwork are recycled–scrap, remnants and re-purposed clothing. Many of the fabrics Jamie uses are donated to her by her lovely fans.

    Pic 2

    Threadwork and stitching techniques are central to the realism and painterly aspects of Seeing in Fabric. Eschewing the dazzling digital age of newer sewing machines, Jamie enjoys the reliability and rustic sturdiness of her vintage 1968 Singer.

    Pic 3

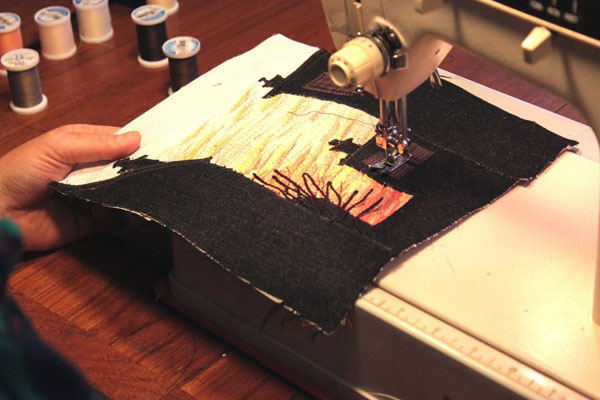
    By using a color palette of thread in over 200 different colors, but just 2 basic stitch types–straight stitch and zigzag–Jamie creates a multitude of “shading”, “brushstroke” and “drawing” effects. Her stitching technique involves a free-flowing and rapid style, requiring an extreme amount of concentration and skill, but also trust and confidence in her sewing machine.

    Pic 4

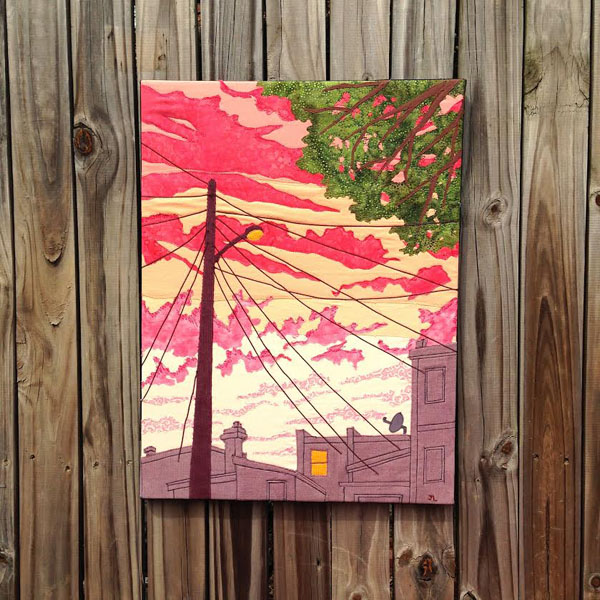
    As a self-taught artist, Jamie constantly pushes herself to experiment with her techniques. Through her artwork she shows the world how to “see in fabric” in order to see the vibrant and strange beauty in our modern urban world.

    Pic 5Jamie will be be traveling from Washington, DC to join us at our 12th Annual Spring Art Star Craft Bazaar at Penn’s Landing Great Plaza on May 9th + 10th.  Make sure to stop by her booth #101 to see these incredible pieces in person.  These photos are so beautiful but the pieces are even better in person.  Visit her Etsy Page for more!

    Pic 6

  • Naturally Dyed Egg Tutorial

    Tutorial and Photos by Christie Sommers of West Oak Design

    Pic 6

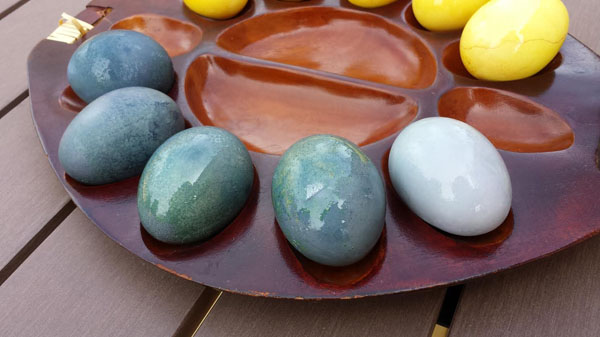
    Here’s a fun little tutorial that you should be able to do for under $5… unless you use what you already have! Just about any vegetable, fruit or herb that will stain your clothes, will stain an egg.  For this tutorial I used red cabbage and blueberries for the blue, and turmeric powder for the yellow.  My original intention was to make a nice set of color gradient ombre dyed eggs but it didn’t exactly work out that way. I was able to somewhat achieve that effect with the blue ones, but the turmeric eggs seemed to stay about the same shade.  If you’re looking for perfect, evenly dyed eggs, this may not be for you. I personally love the earthy mottled effect you get from using natural dyes.Here are a few suggestions you can try:

    RED/PINK: beets,hibiscus tea, frozen or canned cherries, pomegranate, paprika
    YELLOW/GOLD: yellow onion skins, chamomile, turmeric, chili powder
    BLUE/PURPLE: red cabbage, blueberries (fresh, canned, or frozen), grape juice
    GREEN: spinach, dill

    *NOTE last year I used curry powder for the turmeric…. my eggs tasted like curry. If you’re into that.. go for it!

    Pic 1
    For the blue eggs I used:
    – 1/2 dozen hard boiled white eggs (to hard boil: cover eggs completely in cool water, bring to a boil, remove from heat and let sit covered for 7 minutes, then place in cold water to stop cooking process, drain and set aside in the fridge until your dye is ready)
    – 1/2 head of red cabbage cut into 1″ chunks
    *I had some blueberries in the freezer from last summer that were looking freezer burnt so I tossed them in too.
    – a large stock pot
    -mesh sieve or cheesecloth
    -4 cups water (distilled is recommended but I used tap water because that’s what I had and it worked out for me)
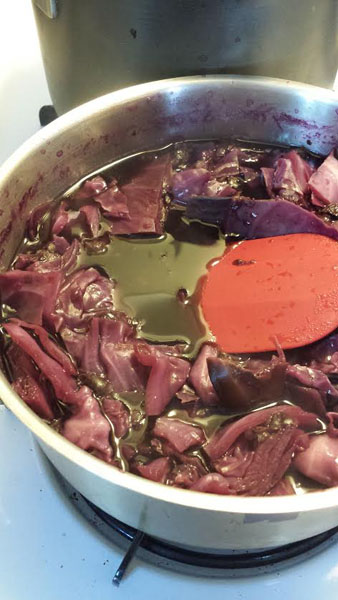
    *a lot of the resources I checked recommend using vinegar but when I used it last year, all of my eggshells became soft and weird… so I left it out this time and the shells stayed in tact.Start by adding the water & cabbage (& blueberries if you have ’em) into your pot and bring to a boil.
    Pic 3
    Reduce the heat to low and let simmer for at least 30-45 minutes. You will notice the liquid becoming opaque and the cabbage will start to look drained of its color.
    Pic 2
    At this point you can strain the solids by pouring through cheesecloth or a fine mesh strainer.You can reduce the liquid at this point making it more concentrated, OR proceed to the next step.

    Place the dye liquid into the fridge and let it cool.For an ombre effect:
    Place all eggs into the cooled dye liquid and place back in the fridge
    Every 15-30 minutes, remove one egg from the liquid.Otherwise, add all eggs to the dye liquid and let sit refrigerated until they reach the desired depth of color.

    *This method can be used for any of the vegetables, fruits, or herbs listed. If you would like to try this with the turmeric powder, Use 3 tablespoons turmeric to 2 cups of water and boil until the turmeric dissolves (this is the ratio that worked for me).

    Pic 4
    Your naturally dyed eggs will have an soft matte color. You can brush a light coat of vegetable oil on them for a nice shine that will really make the color pop.Hope you give this easy & inexpensive technique a try!————————————————————————————————————————————————
    Christie Sommers is the designer and maker behind West Oak Design. She handcrafts small batch and one of a kind goods for home, women, and kids in her Wyndmoor, Pa studio.www.westoakdesign.com
  • Art Star Pop Up Market at Spruce Street Harbor Park

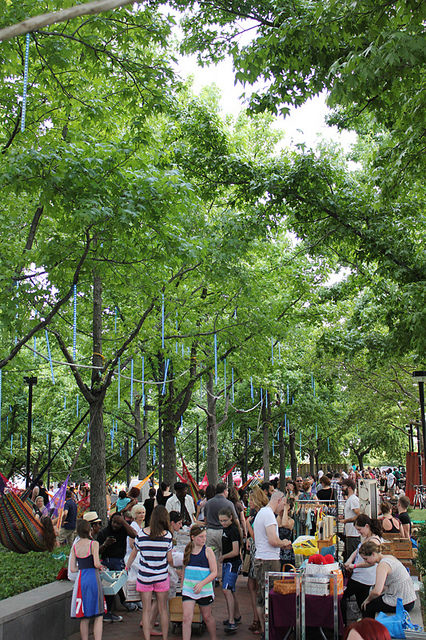
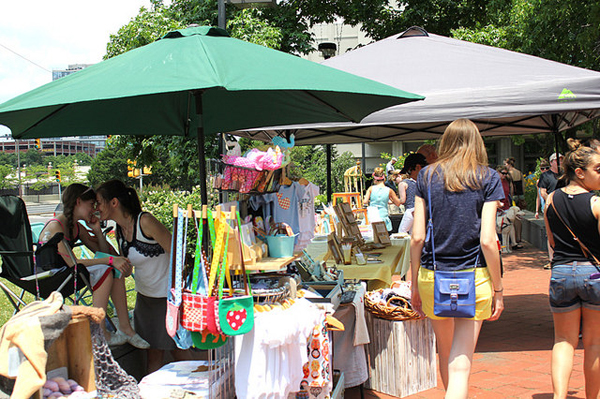
    Promo 3We are excited to announce that our Art Star Pop Up Market will be back at Spruce Street Harbor Park this Summer Season! The Market will take place every Saturday from May 23rd – September 26th from 11-4pm and will feature the work of up to 20 curated art + craft vendors.  Each participating vendor will be set up al fresco style under a tree lined walkway within the popular park.  Shoppers can expect a variety of handmade goods at an affordable price range and the vendor line-up will change each day.

    The Spruce Harbor Park is located along the Delaware River between Lombard and Walnut Streets.  The park features a pop up restaurant and bar, a boardwalk, games, live music, family friendly activities and the most popular attraction – HAMMOCKS!  Apparently, the SSHP hammocks were THE PLACE to take a selfie in Philadelphia last summer!

    Promo 2
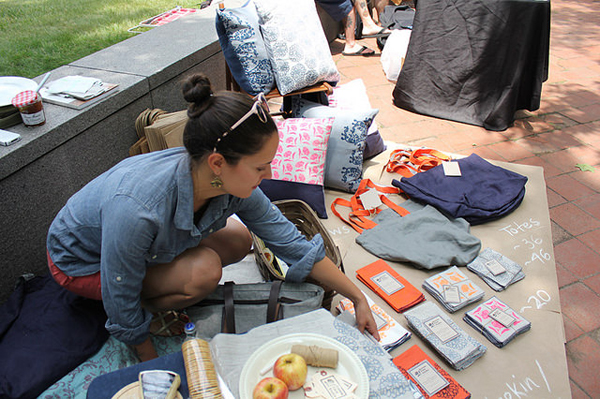
    Bonnie Kaye Studio staged a picnic at last year’s market and displayed all her goods on butchers paper. http://www.bonniekayestudio.com/

    APPLY TO BE A VENDOR!
    We are now accepting submissions for the first few weeks of our  Art Star Pop Up Market.  Each vendor will receive an 10′ wide x 5′ deep space.  Vendors are required to bring everything else needed for set up and display.  You may bring a tent (though it is not required) but must leave 5′ of  your tent open for customers to walk through.  For this show, we are going for relaxed, beach vibes, so you are welcome to go all out with your display or you could simply just bring a blanket and lay out your goods on the ground! We are charging vendors $35 per space / per day.

    We are now accepting applications for the following dates: May 23rd, May 30th, June 6th. (Look out for another Call for Vendors for all the later dates)

    How To Apply:
    Email us at info@artstarphilly.com with “SSHP Submission” in the subject of the email
    Attach 3-5 digital images of samples of the items you wish to sell
    Include a link to your website or etsy page
    List the date(s) you would like to participate on

    DEADLINE TO APPLY FOR THE ABOVE DATES IS April 30th, midnight.
    You will notified of your acceptance by Friday, May 1st.

    Promo1

  • MAKE THIS: Printed Pinwheels for Spring!

    Photos + Tutorial by Bonnie Kaye Whitfield

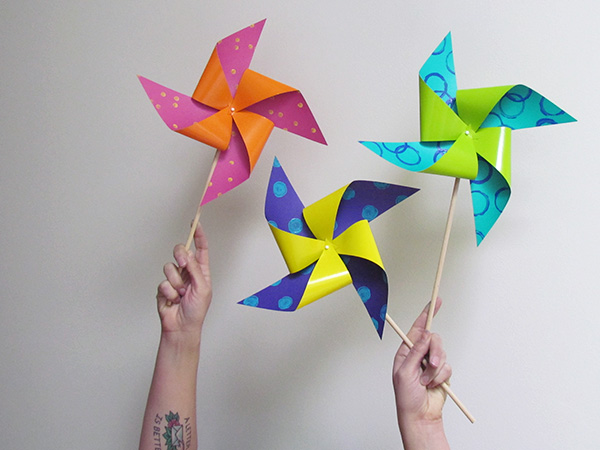
    Ever since I was a kid, I’ve loved pinwheels.  This printed version of pinwheels is a perfect way to lift your spirits after months and months of winter.  Make as festive decor for your next party or create with your kiddo on a rainy day.

    Blog_5_Pic_15

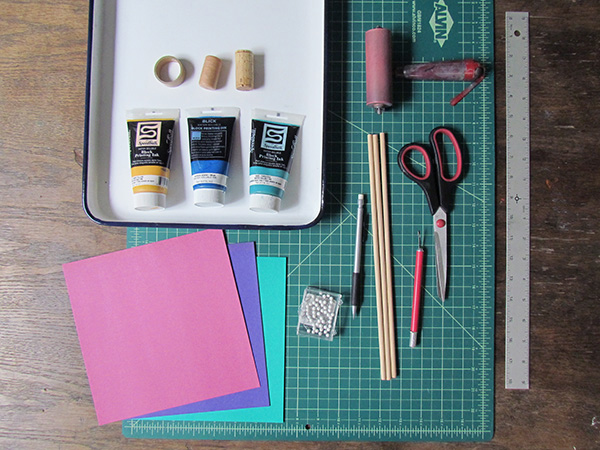
    You will need:

    • square cardstock, ideally different colors on each side
    • scissors or x-acto
    • ink for printing, either water-based block printing or stamp pads
    • ink tray + brayer if using block printing ink
    • circular tools for printing – pencil eraser, wine cork, empty cardboard tape ring
    • dowel rods
    • small tacks/pins
    • scrap piece of cardboard

    Blog_5_Pic_1

    Gather your materials.  Try to work with colored cardstock.  You can test out other papers to see if they hold up to lots of blowing and twirling.  If you have colored ink pads (I didn’t…) then I would use those before turning towards block printing ink, as the prints will take less time to dry.

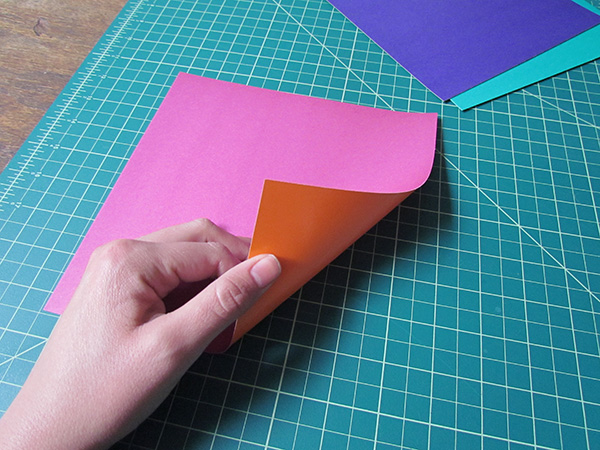
    Blog_5_Pic_2

    If you can find paper that is different colors on each side, it will add to the colorful pop of the pinwheels.  If not, no biggie.  Just work with whatcha got.

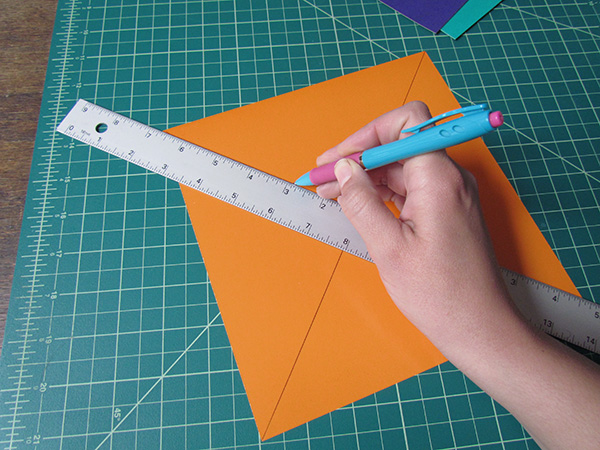
    Blog_5_Pic_3

    Before you begin printing, go ahead and draw two lines of the backside of your printing side.  Use a ruler and a pen to line up opposite corners and draw a line, making a big X across the paper.

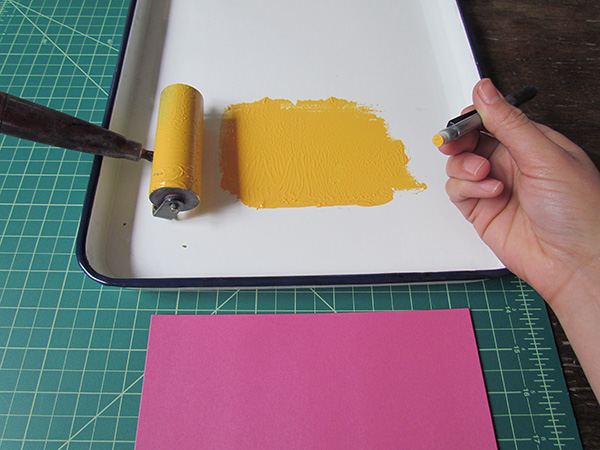
    Blog_5_Pic_4

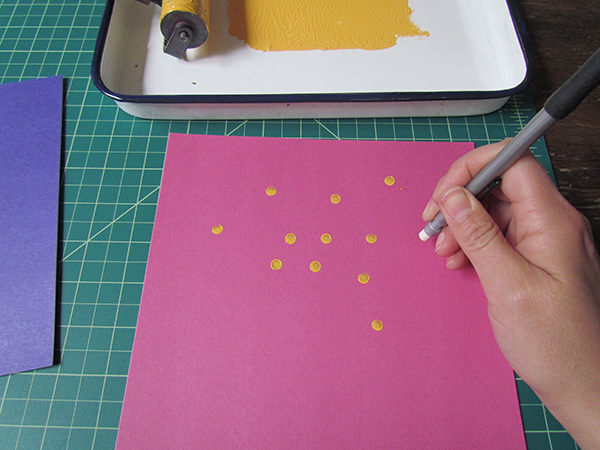
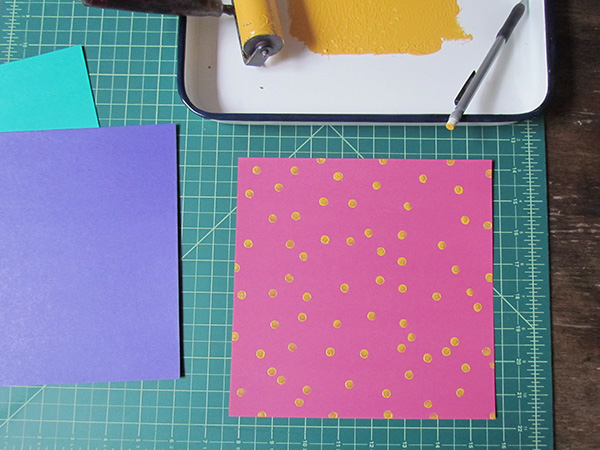
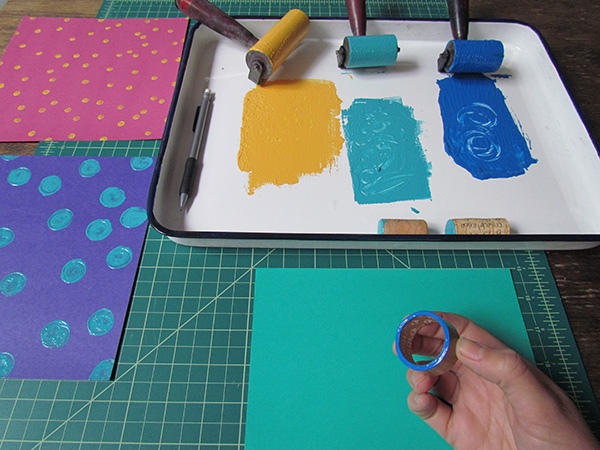
    Now for printing fun!  Roll out some ink in a tray.  Dip your pencil eraser in the ink and go to town.  Pencil erasers make the perfect tiny dot.

    Blog_5_Pic_5 Blog_5_Pic_6

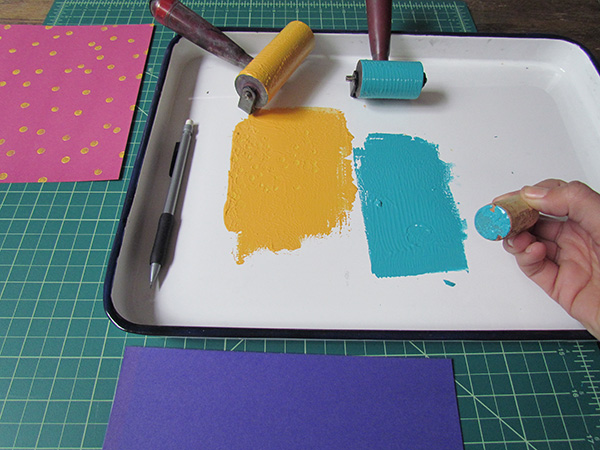
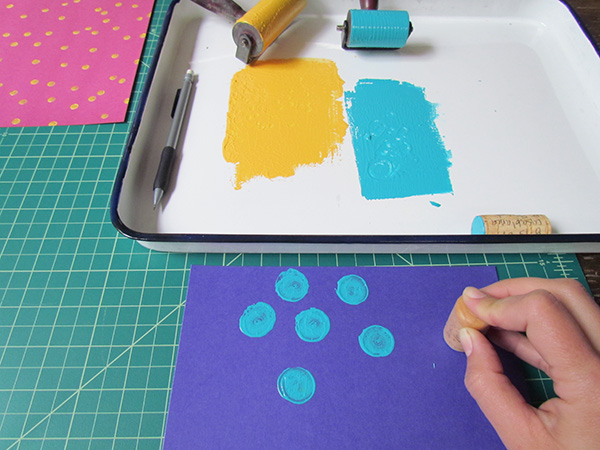
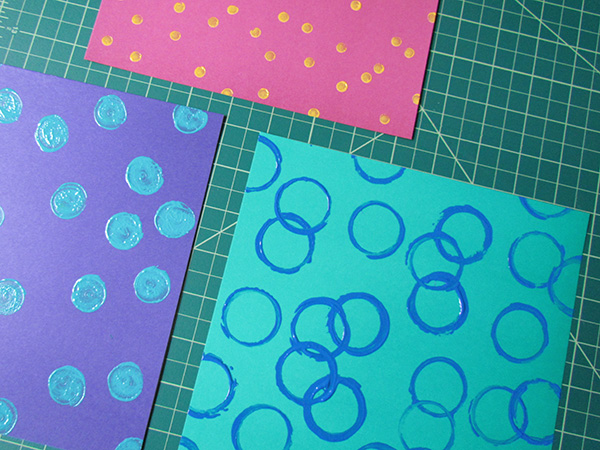
    Feel free to just use a pencil eraser for all your printing, or grab some other circular items to print with.  Here, I’m using a wine cork for a larger circle blob.

    Blog_5_Pic_7 Blog_5_Pic_8

    I also had an empty tape roll on hand.  I recommended scouting out other circular items in your recycling bin, like a toilet paper roll or yogurt container.

    Blog_5_Pic_9 Blog_5_Pic_10

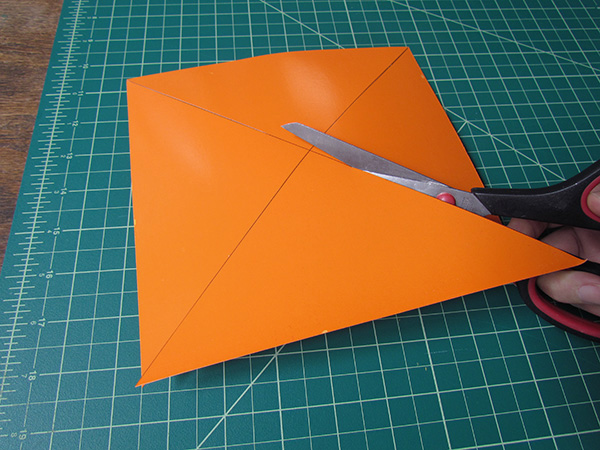
    After the prints have thoroughly dried, grab your scissors and begin to cut on the lines that you drew at the beginning.  Cut on each line until you get about an inch away from the center point – then stop!

    Blog_5_Pic_11

    Now for the only tricky part … pinning them all together.  First, unless these are going to be purely decorative and you don’t want them to spin, you’re going to want to cut out a few dime-sized circles out of cardboard.  This will help the pinwheels spin.  Set the cardboard circles aside.

    Blog_5_Pic_12

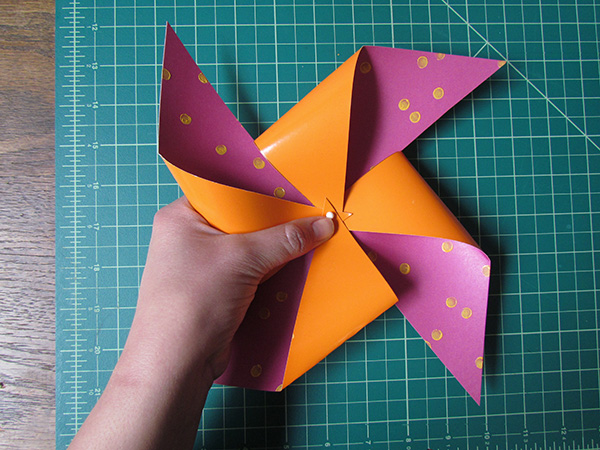
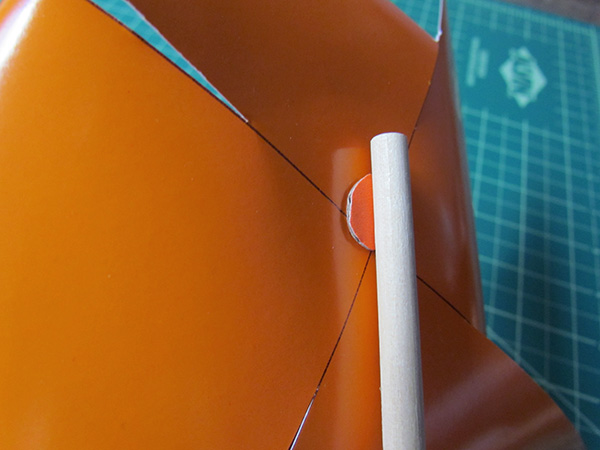
    Begin by folding down every other corner of the pinwheel and hold in one hand.  Grab the pin with your other hand and push through the center, making sure you are going through all 4 corners that you are holding down.  Grab one of your cardboard circles and press it in between the paper pinwheel and the wooden dowel rod.  I find that a couple long presses in the dowel does the trick for me, but then again, I don’t have a 4-year-old that’s going to run around with it.  So if you do, you might want to add a dab of glue before jamming into the dowel.

    Blog_5_Pic_13

    Lastly, if you really want some good spin action, you’ll need to play around with moving the paper around so that it it doesn’t hit the dowel rod when you try to spin it.

    Blog_5_Pic_14

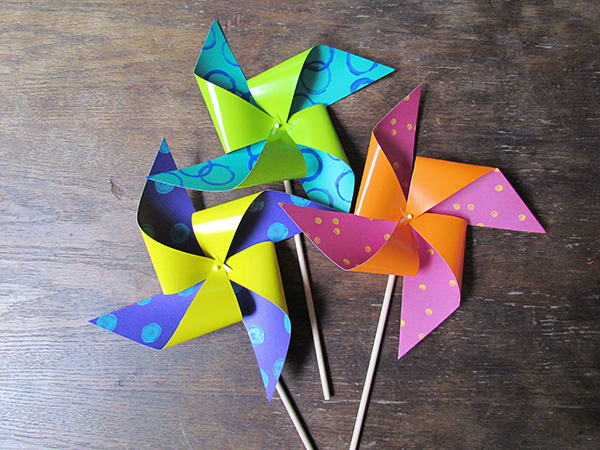
    So there you have it – springtime pinwheels + insta mood lifter!

    ———————————————————————————————————————————–

    Bonnie Kaye Whitfield designs and screen prints home textiles + paper goods under the name, Bonnie Kaye Studio.  Products are created to inspire memories at home and around the table.  A donation is made with every purchase to help feed hungry Americans.
    www.BonnieKayeStudio.com


  • Christie’s Mini Weaving Tutorial (on a “junkmail” credit card loom)

    Tutorial and Photos by Christie Sommers 
    pic1
    You will need:
    picnumero1
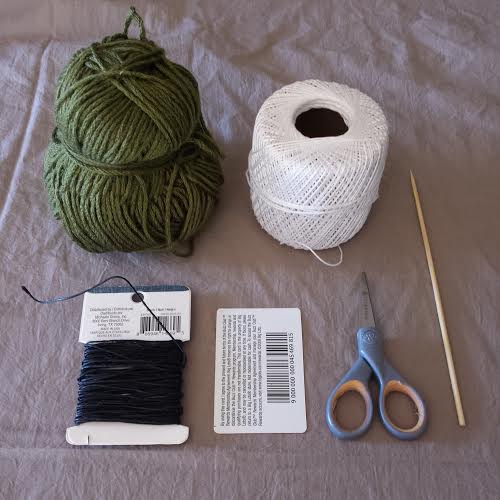
    *An old card of the un-needed variety… pre-approved credit cards, price club cards, your old West Coast Video card… Just make sure it’s nice and firm, no flimsy paper ones.
    *A variety of string/yarn/twine. In this tutorial I am using a thin cotton cord for my warp (I’ll explain soon). For my weft I am using waxed cotton cord in black, thin gauge yarn in green, and more of the white cotton cord I used for the warp.
    *scissors
    *quilting needle (not shown)
    *ruler
    *pencil
    *toothpick, wooden skewer, or short section of brass tubing
    pic2
    Chances are, the card you are using is 2″ x 3.5″. Turn your card sideways so that the 2″ side is at the top and the bottom. Start by marking every 1/4″ across the top and bottom (see pic).  After all of your marks are made, come back with your scissors and make a small cut in each pencil marking. Cut about 1/4″ into the card each time trying to be consistent.
    You will now begin to lay down your weft. The weft is the base that you will be weaving in and out of. I started in the top left corner bringing the thin cotton cord through the first cut from back to front. Bring the string down to the first cut in the bottom left corner, wrapping around the back and coming back up through the 2nd cut on the bottom left corner (see pics).
    pic3 pic4 pic5
    Continue this motion wrapping back and forth until you get to the end. You will have a tail hanging from your starting and end points. Make sure these tails are at least twice as long as your needle.
    Now you are ready to start weaving!
    I threaded my quilting needle with the black cord and wove under one, over one from left to right. When you come back for your return pass make sure you do the opposite of what you did on the previous pass. If you went under the warp on the last pass, go over the next time. It sounds more confusing than it really is… see pic.
    pic6
    pic8
    Continue for as long as you’d like before changing colors.
    pic9
    To change colors/yarn simply trim your previous weft (black cord) leaving a tail that is at least twice as long as your needle. Begin weaving the next color through starting on the opposite side of the previous weft’s “tail”.
    pic10
    Continue weaving and changing color/yarn as desired until you simply cannot fit any more rows. You can use your needle to push each row up to the top so they fit snugly together.
    You’re probably wondering what to do with all of those little tails hanging out of the sides of your weaving. Some people leave them as a deliberate design choice. For this weaving, I am tucking these little tails in for a nice finished edge.
    To tuck: starting at the top left, thread the first tail onto your needle. Tie the tail to the first string of warp and slide the needle down through the loops of the weft carefully trimming the tail and letting it slide back slightly into the loops so that it is hidden.
    pic11 pic12
    Once all of your tails are tucked in, you can stop here or add fringe if you like.
    For the fringe: Because this is such a small weaving, I am going with a very simple fringe. Cut seven 4″ pieces of the green yarn.
    Thread the first one onto your needle and run the needle through the bottom left warp loop.
    pic13 pic14
    Line up the ends of the 4″ piece of yarn and tie it into a knot, sliding the knot snugly up against the bottom of the weaving before tightening.
    Repeat across the remaining white warp loops with the remaining 4″ yarn pieces.
    Do a final trim across the bottom of your fringe.
    Finish your weaving by lining up a 8″ piece of black string with your toothpick/skewer/tubing and thread it through the top warp loops. Tie a knot in your black string & you can easily hang it on a nail. Heck, you can even use a longer string and make it into a necklace… go nuts.
    You’re finished!
    Once you get the hang of the simple act of weaving one over, one under…. take to the internet or your local library and research some new techniques!
    *Disclaimer: I am not a trained weaver. I am self taught. Most people start with the fringe first and work their way up.  Starting at the top works for me… so that is how this tutorial goes;)
    Enjoy!

    —————————————————————————————————————————————

    Christie Sommers is the designer and maker behind West Oak Design. She handcrafts small batch and one of a kind goods for home, women, and kids in her Wyndmoor, Pa studio.www.westoakdesign.com

  • Art Star Craft Bazaar is Coming to Asbury Park!

    We’ve got some exciting news!! We are bringing our Art Star Craft Bazaar to Asbury Park, New Jersey!

    Asbury Web

    Don’t worry, we will still host our bazaar twice a year in Philly.  We’ve been looking for a 2nd home for our show for quite a while now, so this will just be another location added to our roster.

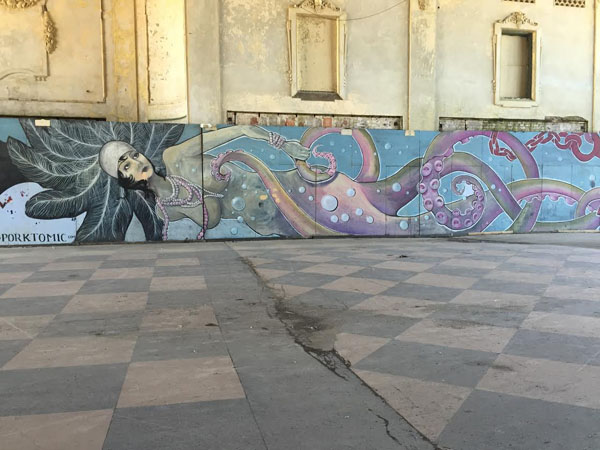
    Asbury Mural
    Awesome Mural in Asbury Park by Porkchop. Photo Courtesy of Move For Hunger.

    Asbury Park is a perfect fit for our show.  There is already a flourishing creative scene happening there and also tons of independent shops and restaurants.  It is just our style.

    We will be bringing our bazaar to Bradley Park, which is a city owned park situated right across the street from the Asbury Park Boardwalk and their Convention Hall.  The show will be held during the city’s peak summer season, on the weekend July 25th + 26th.  The city has a devoted art/craft community, which is active year round.  We hope to attract this audience, tourists, as well as our own Art Star following.

    We are excited to be partnering with Asbury Park based non-profit, Move For Hunger. We will be collecting a $3 suggested donation at the door and 100% of that will go directly to this amazing organization.

    Move For Hunger is a 501(c)3 nonprofit founded in 2009 to transform moving into an opportunity to reduce food waste and help feed the hungry. Move For Hunger is a national organization working with over 600 relocation partners and thousands of real estate agents to bring awareness to hunger in America. Currently over 1,151,000 residents of New Jersey struggle with hunger. Move For Hunger is working to ensure less food goes to waste and more is delivered to those in need. In just five years, the Move For Hunger program has delivered over 4.5 million pounds of food to community food banks nationwide.

    Food_Drive
    Photo Courtesy of Move For Hunger


    The Asbury Park Art Star Craft Bazaar will be very similar to our popular spring bazaar at Penn’s Landing Great Plaza in Philadelphia.  Around 100 art/craft vendors will be set up selling their wares in Bradley Park.  On that note, we are now accepting vendor applications for this show!  So if you are an artist or crafter who would like to apply to participate, please go here

    We are also looking to bring in some locally based art organizations/non-profits to set up at our show in exchange for providing a free interactive art/craft project, or as we call them “make + takes”, for guests to come and make something that they can take home with them that day.

    We are so excited to bring our bazaar to this amazing city and we hope you are to!  Please continue to check the site for updates on the show.  If you are a business based in Asbury and want to work together – cross promote or provide a make + take, please get in touch with us.  We are looking to collaborate and involve the city as much as possible!

  • Christie’s Paint Chip Wall Art DIY

    Photos and Tutorial by Christie Sommers

    Photo 6

    You will need:

    *paint samples from your local hardware/paint store
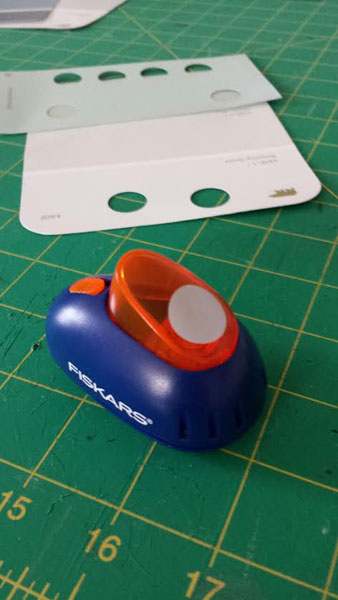
    *a circle punch (found in the scrap booking section of your nearest craft store). I used a 5/8” punch.
    *a glue stick (I prefer Elmer’s Craft Bond)
    *a sheet of card stock (this is what you will glue your circles to)
    *ruler
    *pencil
    *a picture frame if you would like to display your finished project

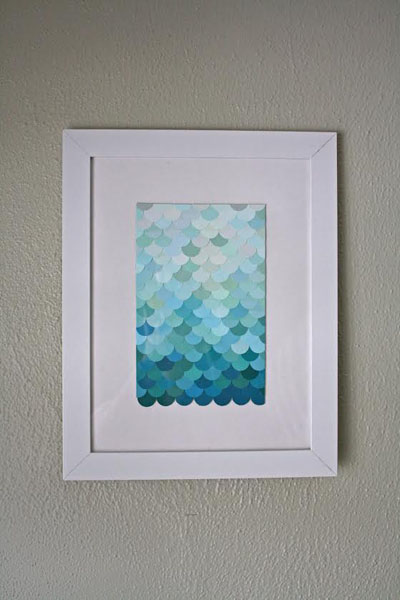
    Start off by punching out your circles.  For my 4-1/2” x 7” collage I used 161 circles. Arrange your circles by color in 3 piles: lightest colors, mid range, and darkest.

    Photo 1 - Copy Photo 2 - Copy

    Take your piece of card stock. You are going to draft out a grid so you can line up your circles nice and straight. Because my circles are 5/8”, I went up one side of the card stock marking every 5/8″.  Repeat on the other side of the card stock and you now have the start & finish point of each line.

    Photo 3 - Copy

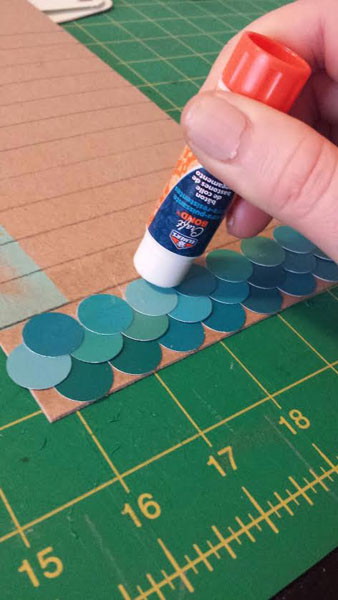
    Once your lines are drawn, start at the bottom of your card stock and glue a random mix of your darkest circles across the first line.

    The next row will be placed between your pencil lines. Place the first circle of row 2 between the first two circles in row 1 (see pic). Every other row is staggered giving you a fish scale pattern.

    Photo 4 - Copy

    Continue gluing rows, going from dark to light, until you reach the end of your desired finished project.

    Photo 5

    If you want straight edges, you will need to do some trimming. I trimmed off the two sides and top of mine. The bottom of my collage will give you an idea of what it will look like if you decide not to trim the edges.

    Let the glue dry for at least 10-15 minutes before trimming.

    To trim, I used a straight edge ruler, an X-acto knife and my cutting mat. If you don’t have a cutting mat/x-acto… you can take a ruler and line it up along the edge you want to trim, draw a pencil line marking where you will cut, and simply trim with scissors along your pencil line.

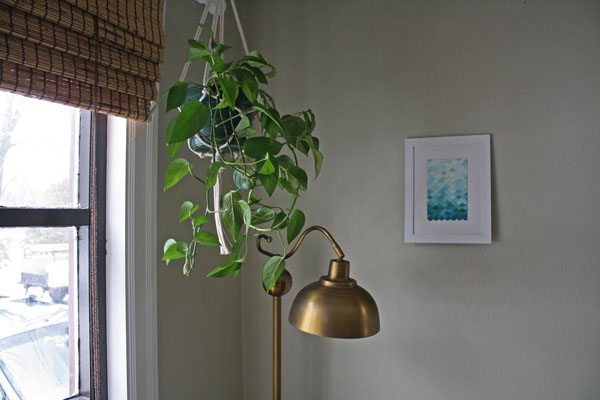
    Frame & enjoy!

    Photo 7 - Copy

    ———————————————————————————————————————————————

    Christie Sommers is the designer and maker behind West Oak Design. She handcrafts small batch and one of a kind goods for home, women, and kids in her Wyndmoor, Pa studio.www.westoakdesign.com

The owner of this website has made a commitment to accessibility and inclusion, please report any problems that you encounter using the contact form on this website. This site uses the WP ADA Compliance Check plugin to enhance accessibility.